Before diving into topics like bezier curves and drawing 3D graphics, we look at something more fundamental: lighting. This is especially important in vector graphic design, as compared to other methods like physical oil paint or digital painting, vector graphics tend to appear very flat and plain, and proper use of color and lighting becomes vital in order to express depth and the geometry of the subject.
Take the stone slab from the previous module, for instance.:

Now see what happens when we add some gradients to it, taking lighting into consideration:

Now it is easier to see that the slab has rounded edges. When creating graphics, you should consider lighting in parallel with the geometry of what you are creating, as it can significantly alter the outcome of your piece.
Elements of Lighting
Searching "lighting" on Google returns "the arrangement or effect of lights." In the context of graphic design, lighting is the considering how light behaves in the scene to decide the final colors and effects of the graphics. This of course includes things like shadows, but for now we will focus on color. More specifically, we introduce four key elements of lighting you should consider when deciding colors for a scene.
Color of Object
The most basic thing to consider is the color of the object itself. For example, if you take a white baseball and shine a red light onto it, it will obviously turn red. But what if you take a red ball, and shine a blue light onto it. You can check the result yourself by taking something red at night, putting it under the moonlight, and snapping a photo of it. The chance is, if you zoom in enough, you will see dark purple.
This example also introduces a concept that will appear frequently in the other three elements, as well as lighting in general: the concept of adding lights. Actually, you have probably seen this before, in diagrams like this:

Unlike paint, light is additive, meaning you cannot make a light darker by combining it with some other light - lights can only become brighter as you combine them.
Diffuse Lighting
Diffuse light gets its name because it simulates the behavior of light when it hits a bumpy surface, scattering, or diffusing, the light in all directions. The viewer perceives a matte surface that lacks shine.
Mathematically, the brightness of a surface on a diffuse surface is relative to the cosine of the angle between the normal vector of the surface and the vector to the direction of the light source. If all that math scared you, no worries. This is just a fancy way of saying that surfaces facing toward the light source will be bright, and surfaces facing away from the light will be dark.
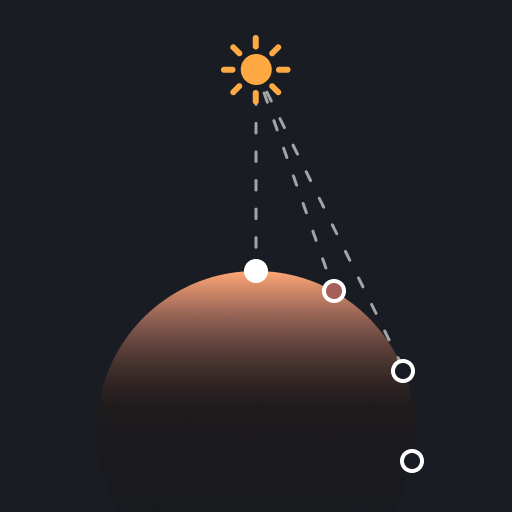
Diffuse lighting is the most common and basic form of lighting, as it is good at expressing 3D surfaces.
Specular Lighting
Specular lighting simulates light on a shiny surface. You can think of a specular surface as a mirror. A more specular a surface is, the close it is to a finely polished mirror, while a less specular surface (like aluminum casing of a smartphone) will be closer to a blurry mirror.
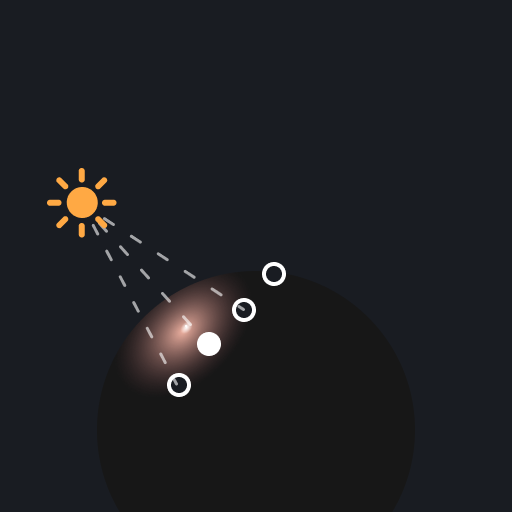
Technically, this means that if you (the viewer) is in a position where an incoming light from a light source can bounce off the surface and strike your eye, that surface will appear illuminated. Other parts of the surface will not appear illuminated, since the light from the light source will bounce off into a different direction. This did not happen in diffuse lighting, since even if the light hit a surface that did not reflect the light ray into your eye, the light would scatter in all directions on the surface, and some of that will end up in your eye.
Specular lighting is arguably the hardest of the four elements, since you need to consider what will be in the reflection of the surface if it was a perfect mirror. In reality, that is WAY too time consuming, so we use various tricks to simulate a reflection, which we will go over later. For now, just know that specular surfaces are basically mirrors.
Last thing to note is that surfaces are usually not a binary of diffuse or specular, but rather a mix of the two. Below, adds specular lighting to a diffuse lighting to achieve a surface like polished wood or plastic.

Environmental Lighting
The last element is perhaps the easiest, yet the most overlooked type. As the name implies, environmental lighting is not a light from a specific light source, but from the overall surrounding environment.
For example, take a look at this cloud.

Notice how the part facing away from the sun is not black, as you would expect shadows to be. It is blue. The reason is because the surrounding sky is blue, which beams in blue light from all directions, illuminating the shaodow with a blue tint. Again, remeber that light is additive - black, which is the absence of light, plus blue, is like calculating 0 + blue, which is blue. If you search images of clouds in a sunset, you will see this effect hold, as clouds' shadows turn purple and dark blue.
In the case of the ball from earlier, the background was given a slight blue tint, so we assume there is blue environmental light coming in. As such, we give a slight blue tint to the shadows. In addition, we also add a slight blue tint to the darker parts of the ball ,where the orange light is not as prevalent. In this case, we add dark orange + dark blue = dark purple.

Lastly
We discovered the four fundamental elements of lighting
- Color of object
- Diffuse Lighting
- Specular Lighting
- Environmental Lighting
With the basics down, in the next module we will explore how to combine what we learned and make a donut.