Introduction
This part will introduce you to a high-level overview of Git, a software tool used to manage your coding projects. Basics concepts and the underlying
structure of Git will be covered. More details on how to use Git will be given later.
Overview
Say you are writing some code. You want to keep track of the progress you made so far, so you decide to
create seperate files every time you add a chunk of code. Eventually, you end up with something like this:
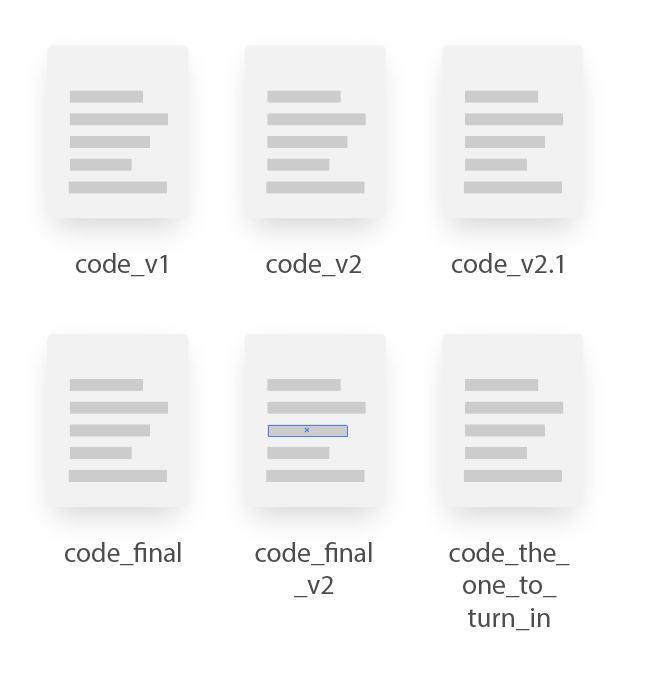
I'm almost sure you have done this at least once
This works fine for small projects, but you can probably imagine how for
large scale projects it will just be a mess. This is where Git comes in.
I'm almost sure you have done this at least once
Git is a type of software known as a version control system. It helps developers keep track
of updates and modifications to their programs in a systemized way.
Furthermore if you visit their fficial website, you will notice they brand themselves as the
distributed version control system. This means that when multiple developers are working on the same project,
each developer will have their own copy of the project. As the development progresses, each developer will intercommunicate with
others and share their code.
This scheme may be a bit problamatic, however. For example, if you want to know who has the latest version
of a code, you will have to check in with all other developers to see who has it.
In such cases, it may be easier if there is a single place to store the code, which is guranteed to have the
latest code which everyone can access.
This is where GitHub comes in. Like its name, GitHub is an online hub where people
using Git can centrally store their code.
We will dive deeper into GitHub in a later part.
Getting started with Git
Before we talk about GitHub, we will go over Git. Git is best understood if we visualize versions of code to be on a single line:
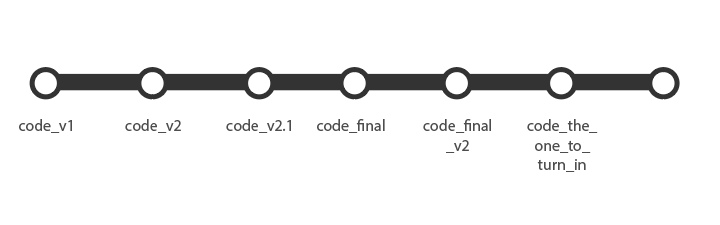
Left to right
The dots on the line are called commits, and can be thought as
checkpoints in your code. It is recommend you make commits before and after major
changes to your code, so in case you mess up a code you can return to a previous checkpoint
and undo your changes.
Another important concept in Git are branches. Say you have a feature you want to
add to your code, but not sure at the moment if you want to actually implement it.
Take a look at the following graph, for example:

At the moment, we are at version 2
Instead of continuing on with the current code, we can make a new branch at code_v2,
called new-feature. This will virtually create a clone of code_v2, which we can freely work on
without worrying about messing up our original code. With this applied, our diagram will look like the following:
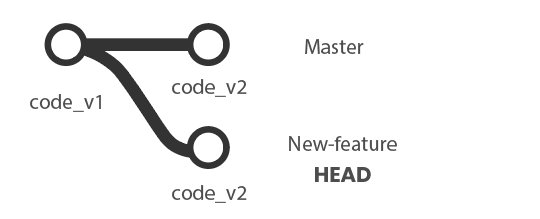
At the moment, we are at version 2
Woah there! There are bunch of terms that suddenly popped up. We will explain them one by one
- By convention, the very first code you create is in a default branch called
master. That is why the original line is now labeled as master new-featureis again, the name of our new branch.HEADis a term used to indicate the current branch we are working on. In this case, we want to work on implementing our new feature, so
it points tonew-feature
We will see of these action in later sections. Stay tuned!
Add and Commit
So whatever branch you may be on, you wrote some code and ready to make a commit. But what exactly is a commit, and what does it do?
Usually a commit will be a 2 step process: add and commit.
In an add, you bundle together the files you have modified into a single package, called a tree object. The files you modified are
stored in the tree object in a format called a blob
In an commit, you record the tree object and other misc. information into an object called the (drumroll.....) commit object.
This commit object will then be recorded onto the branch.
Merge
Last but not least, we talk about merge. Merge is an important concept that you will encounter in various scenarios, so read carefully🧐
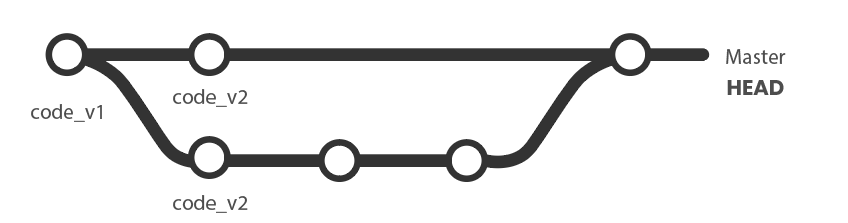
Say you wrote some code and made lots of commits to implement the new feature from earlier. The current diagram looks like this:
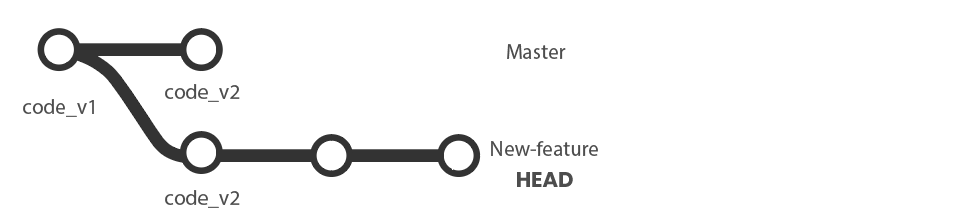
At the moment, we are at version 2
When you perform a merge, Git will try to combine the two branches back into one. This is done by "replaying" the commits you made in
the new-feature on the master branch. In other words, it looks at all the chnage you have made so far, and
applies them one by one to master.
More often this not, this process often results in a merge conflict, where a change you made conflicts with another chnage,
usally made by another developer working on the same project. Examples of scenarios where merge conflicts arise include:
- You try to update your code to apply chnages another developer made, but the chnages include deleting a large portion of a code you worked on
- Conversely, you want to send an update you made to another developer, but it overwrites some of the chnages they made
There are simply way too many specific scenarios a merge conflict can happen, and equally many ways to resolve them.
So instead of listing them all out here, we will discuss them as we progress in this tutorial. For now, we assume there was no conflict, or we were able to resove any conflicts.
The resulting diagram will be like this:
At the moment, we are at version 2
Notice HEAD is pointing at master, as it is the only branch we have now.
The master branch now contains all of the chnages you made in the new-feature branch.
Lastly
Thanks for reading through this post ! (unless you skipped here). If you have any comments/feedback about anything,
including the formatting of this page, feel free to text or email me. In the next part, we will go over the basics of GitHub.